Using a Scale Ruler: Accurate Measuring & Marking of Technical Drawings
Learning to measure and mark technical drawings using a scale ruler is a foundational skill for anyone working in stagecraft, scenic design, or general AV/production environments. This article and accompanying video will guide you through the basics of using a scale ruler, so you can confidently tackle your paperwork and project drawings with precision.
Overview:
A scale ruler allows you to measure and transfer accurate dimensions on drawings that are scaled-down versions of real-life objects or spaces. Common scales you’ll encounter include 1″ = 1′, 1/2″ = 1′, and 1/4″ = 1′, each denoting how the drawing’s inches correspond to feet in reality.
Step-by-Step Guide to Using Your Scale Ruler
1. Selecting Your Scale
First, identify the correct scale for your drawing. For example, if your drawing uses a “1″ = 1′” scale, use the corresponding side of your scale ruler.
Tip: Many technical scale rulers are triangular, with each side housing two scales.
2. Align and Mark
-
Fold your scale ruler worksheet (if provided) so it creates a clear, straight edge at the top of the chosen scale.
-
Place the “zero” end of the scale at the starting point on your drawing.
-
Read the measurement that aligns with the endpoint of the line.
3. Measuring a Line
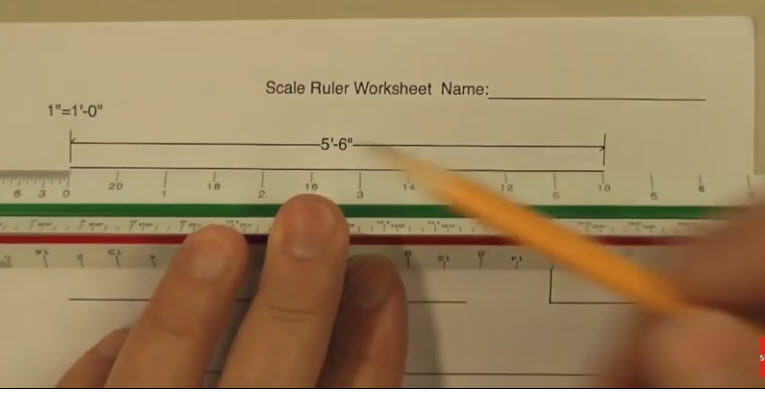
Let’s say you need to check a line that’s supposed to represent 5′-6″ on a 1″ = 1′ scale:
-
Place the “0” mark of the scale at one end of the line.
-
Find where the line ends along the scale—this should line up at the 5′-6″ mark.
The plastic scale ruler is generally more accurate than a paper one due to line thickness and durability. Always use a sharp pencil; the width of your pencil lines can affect measurement accuracy at scale.
4. Measuring with Other Scales
-
Flip to the 1/2″ = 1′ or 1/4″ = 1′ side of your scale ruler as required.
-
The process remains the same: align zero, measure, and carefully note the point on the ruler where the line ends.
5. Drawing and Marking Dimension Lines
-
Use a straightedge or triangle for clean, straight dimension lines.
-
Draw your dimension lines slightly away from the actual object lines, using little arrowheads or tic marks at both ends.
-
Mark each dimension using the correct architectural format: feet (′) and inches (″). Example: 6′-3″.
Dimension lines can be drawn before or after making your measurements—it’s up to your workflow preference.
6. Tips for Best Practice
-
Always double-check your scale before marking or measuring.
-
Get in the habit of labeling every measurement for clarity.
-
If possible, practice with both paper and plastic scale rulers to get comfortable with the differences in accuracy.
[Insert illustration or image: Scale ruler measuring a line labeled “5′-6″” on a technical drawing]
For more information and downloadable guides, visit industry resources like Stage Lighting Primer, Vectorworks Help, or HSTech.
Frequently Asked Questions
Q: What if my line falls between marks on the scale?
A: Estimate as closely as possible. On precise projects, use the plastic ruler and the sharpest pencil you have for the best results.
Q: Can I use a regular ruler if I don’t have a scale ruler?
A: You can for practice, but for classwork or professional designs, a dedicated scale ruler is essential for accuracy.
Interactive Prompt:
Try measuring three different lines on your worksheet using all three scales. Which one do you find easiest, and why? Share your thoughts or questions in the comments below or discuss with your class group.
Video Transcript: Measuring With a Scale Ruler
On-screen action matches the following narration.
“On the scale ruler worksheet, let’s take our scale ruler—if you have the common triangular one, you’ll see your 1″, 1/2″, and 1/4″ scales. For this example, fold your paper to create a flat edge at the ‘1″’ scale.
Place the zero on your drawing line. This line should be 5′-6″; you’ll see that mark on the scale. Now, using a regular ruler, you’d line up and see where it lands, but it’s not as direct or accurate as using your scale ruler.
With the plastic scale ruler, for example, you’ll see that you can measure down to fractions of an inch—sometimes as precise as a quarter-inch in this case.
Try the same for the ‘1/2″ scale’ side. Start at zero, read the endpoint, and label your measured dimension in feet and inches following the standard notation.
Always draw your dimension lines neatly and label them. Use arrowheads or tic marks—neat, uniform dimensions make your drawings more readable and professional.
Remember, accuracy matters: the width of your pencil line at scale makes a real difference!
Good luck, and practice these steps until they feel natural.”